Feeds:
Posts
Comments

Posts Tagged ‘lunch’

DSC_0337

My April vacation has come to an end and I’m back to the daily grind. I will get more into what I did in my Travel Tuesday spots but I spent about a week at the Sunshine Coast, two days on a tour of Fraser Island and 4 days on the Gold Coast. The Gold Coast was a surprise addition to my travels and I am so glad I seized the opportunity to go when it was presented. Sometimes the best things in life are the ones that aren’t planned!

Anyway, with all of my traveling I haven’t had a ton of opportunities to cook. I did have a chance to help out at Easter dinner on the Gold Coast, though. I spent dinner with one of my boss’s business partners, Sharon, who opened her home to me and made me feel like family. Her family was so welcoming!

On Easter, I was put on veggie duty and helped make some homemade salsa and this super yummy salad. I was surprised how much I loved it! The ingredients are so simple but it is just so delicious. The first thing I did when I got back to Toowoomba was make a big batch for myself.

Of course, my second attempt at this salad didn’t come out as good as the one I made at East. Apparently, searching Youtube for Taking Back Sunday music videos instead of stirring the pine nuts is a big no-no. So you know, I wouldn’t recommend doing that.

DSC_0341

White Bean and Tomato Salad

  • 1/2 c. pine nuts
  • 550g or about 3 cups of mixed tomatoes, sliced (I used 350g of mixed grape tomatoes and 200g of yellow perino tomatoes. I like the smaller tomatoes but any kind will work)
  • 1/2 red onion, thinly sliced
  • 1/2 c. basil, thinly sliced
  • 1 can cannelloni beans, drained and rinsed
  • slightly less then 1/4 cup olive oil
  • salt and pepper, to taste

Place pine nuts in a small skillet and heat over medium-low heat. Stir continuously until the pines nuts begin to turn golden. Remove from heat and set aside.

Combine tomatoes, red onion, basil beans and toasted pine nuts.

Right before serving, add olive oil, salt and pepper to the tomato mix and tossed until well combined.

DSC_0386

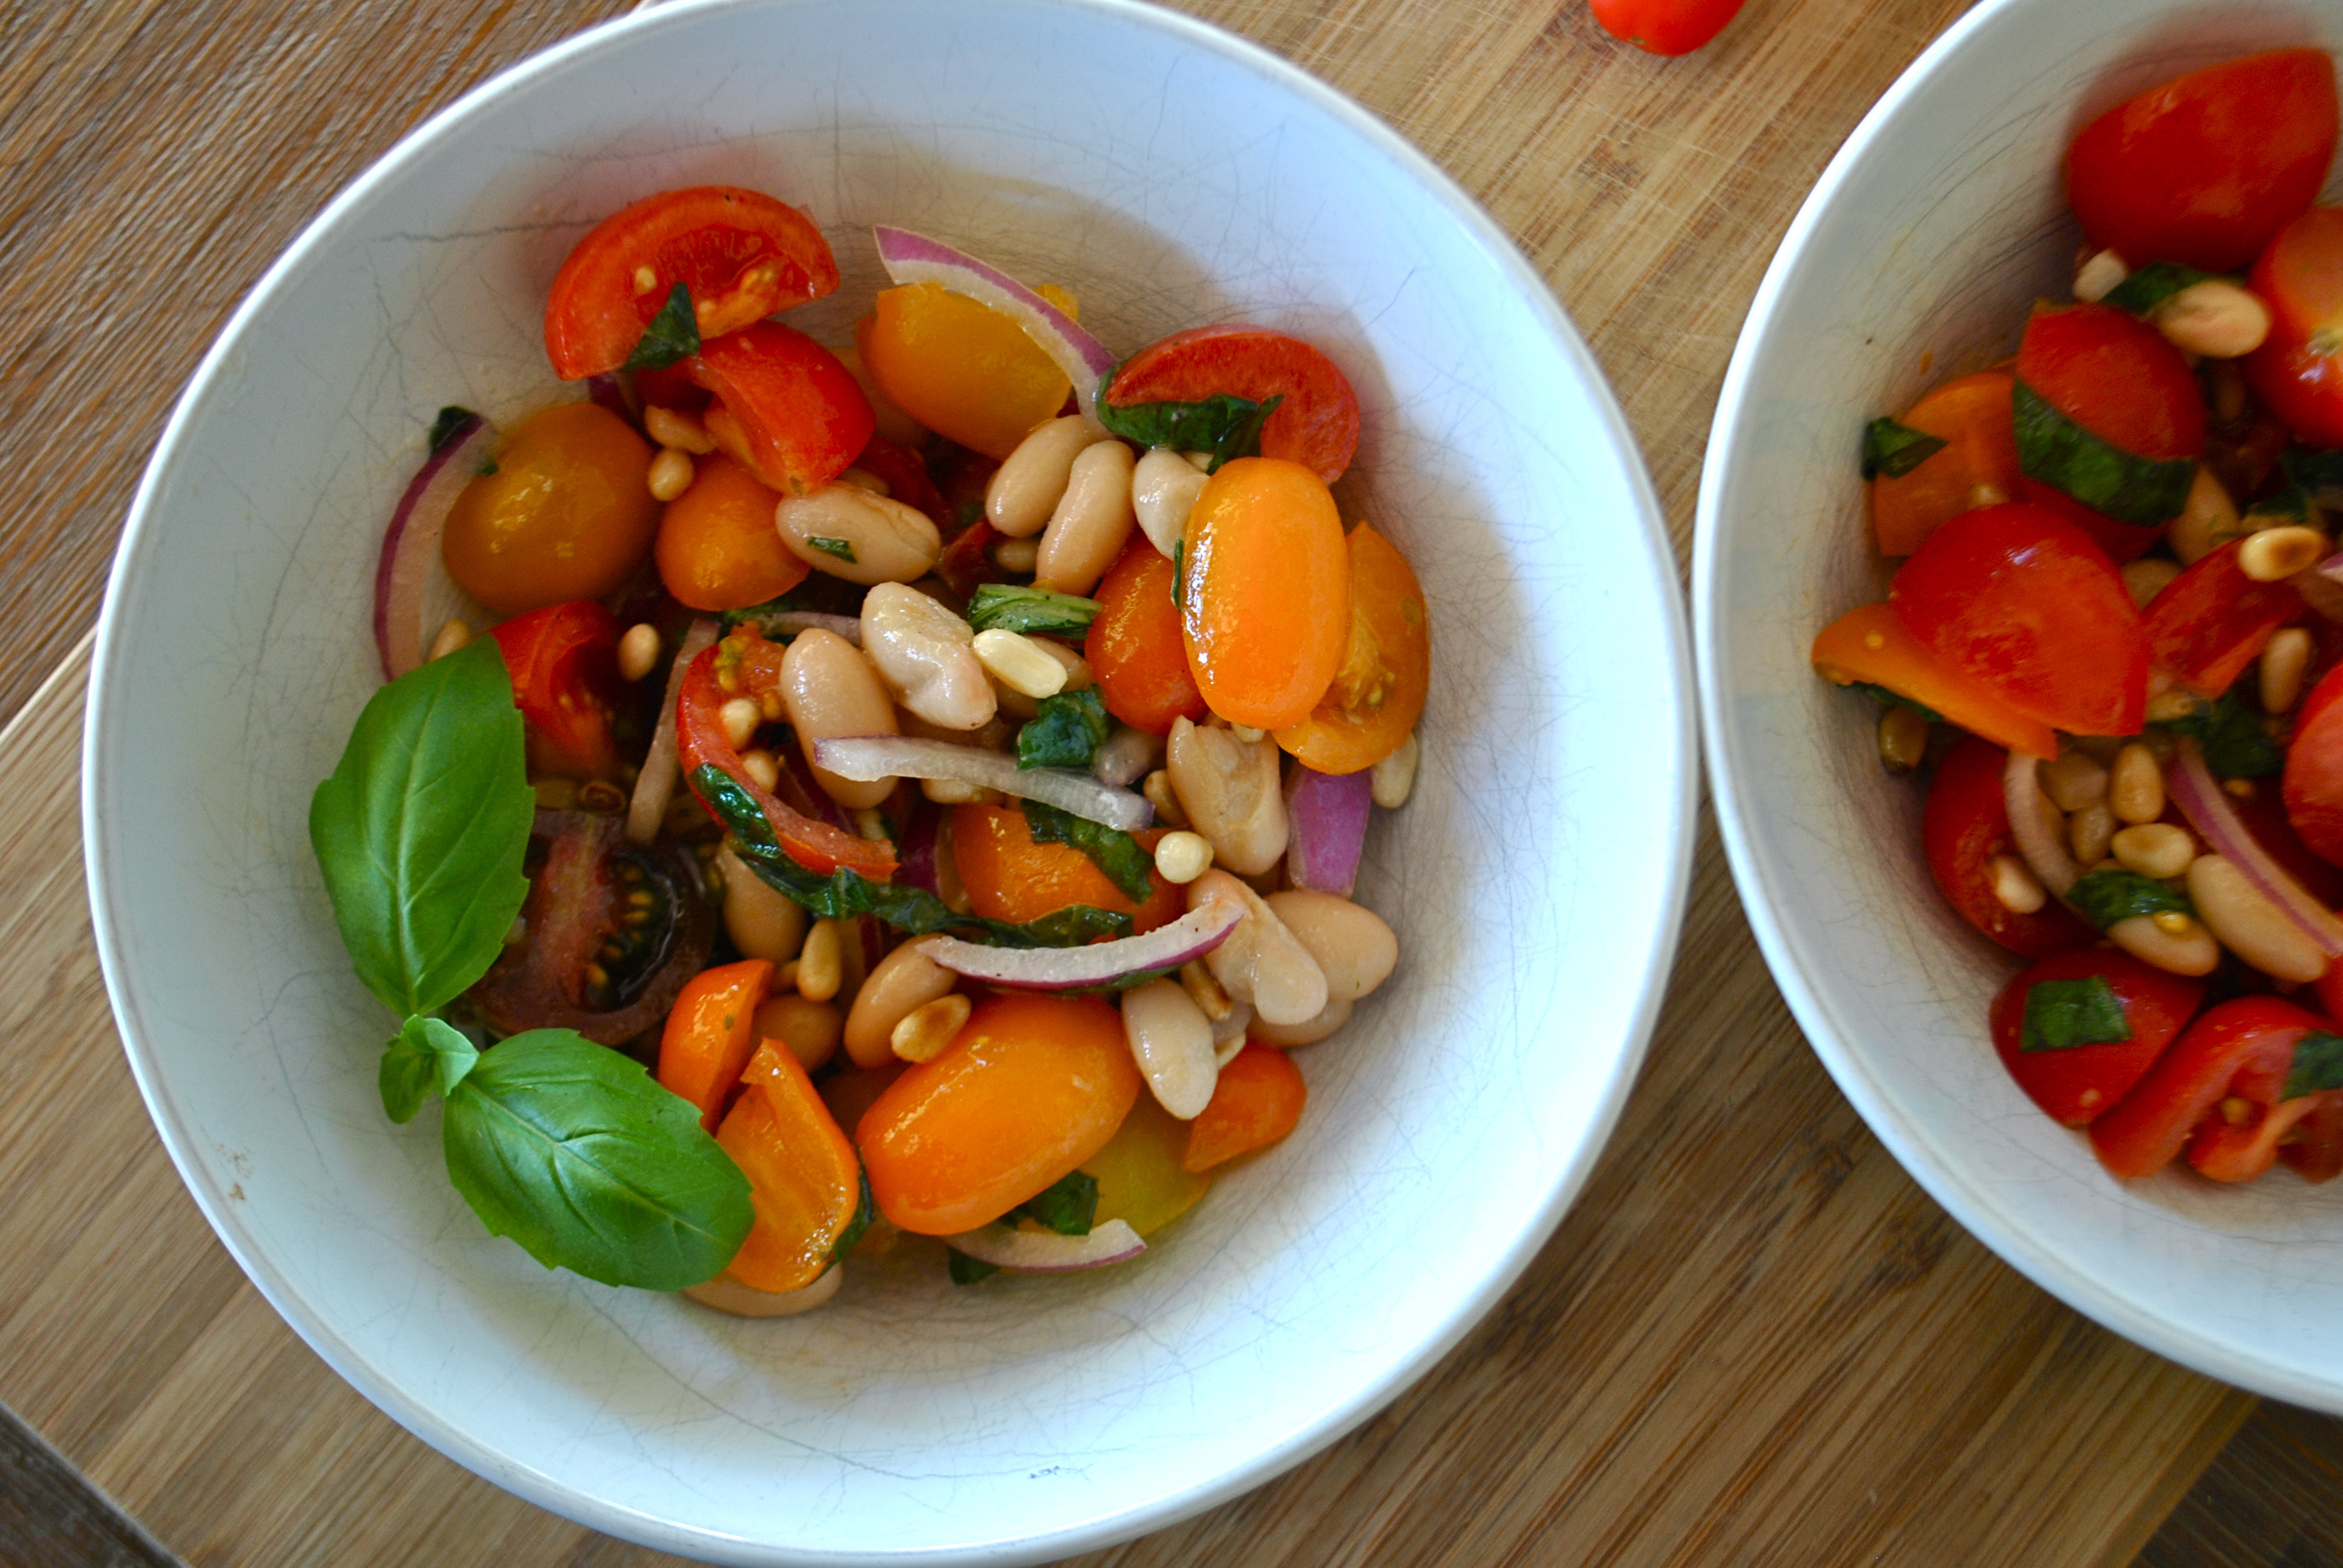
I opted for the mixed grape tomatoes and the yellow perino because they tend to be sweeter and because they were just so gosh darn pretty! I mean, the deep red ones are practically purple so clearly I had to purchase them.

Plus, You tube distractions aside, this was such an easy dish to make. I love it because it comes together in minutes and it will last me a few days. It’s pretty and it comes together easily. What more could you ask for??


Read Full Post »

DSC_0882

Remember when I said I was in a food rut? Apparently that is still in place. I just checked my back posts and realized I haven’t posted a recipe for a real meal since Dec. 2. It’s been desserts, snacks and breakfast foods ever since then.

I mean, if I’m being honest with you, those are the only meals that I really care about but I try to at least pretend to be a responsible adult.

To make matters worse, this wasn’t even really my idea! As I’ve mentioned in past posts, I love wraps but can’t successfully wrap a wrap to save my life. I almost always put too much or too little in, never heat them correctly and somehow rip them. It’s a serious problem people! And that’s with normal, run of the mill flour tortillas. The one time I tried rice paper wraps was disastrous!

Instead, this recipe is due 100% to the fact that when I asked the 13 year old what he wanted for lunch one day, he said “summer rolls with noodles”. I laughed at him, told him we didn’t have the ingredients, he found them, proceeded to laugh at me and then I had a mini panic attack because  I can’t handle rice paper wraps!

Fun twist, I can, in fact, handle rice paper wraps. So much so that I’ve made them about a million times for lunch since that fateful day AND made them one time to feed the family while the Dad was away. I got all the ingredients ready, laid them out and the kids made their own. It was a hit! Here’s my favorite variation:

DSC_0879

Tofu Mango Summer Rolls
makes 3 wraps= 1 serving

  • 25g of asian marinated tofu*
  • 1/5  an english cucumber, grated
  • 1/2 a large carrot, grated
  • 1/2 an avocado, cut into strips
  • 1/3 a mango, cut into strips
  • 1 green onion, green and white parts, sliced
  • 1/4 cup basmati rice, cooked (angel hair pasta also tastes really good and is what I used with the kids)

For dipping sauce:

  • 1 TBSP Sweet Chili Sauce
  • 1/2 TBSP Low Sodium Soy Sauce (or more to taste)
  • splash of toasted sesame seed oil (optional)

*weird measurement, yes. But I’ve been using  this tofu, which is pre-marinated and comes in four pre-cut servings. I know, it’s lazy but at least it’s not more dessert!

Instructions (I’m including step-by-step pictures, which I normally hate but sort of felt necessary):

1. Get all your ingredients set up on your chopping board. You have to work quickly when you are making these.

DSC_0885

2. Grab a pot or pan that is large enough to lay your wrapper in without bending it. Fill it  with warm water (I like a frying pan best). Line a plate with a clean, dry towel.

3. Submerge your wrapper in the warm water for approximately 30 seconds until it is soft and pliable.

DSC_0889

4. Lay out the wrapper on the clean towel (this towel is clean, I swear!).

DSC_0903

5. Pile the ingredients on one end leaving room to fold the end over the ingredients, like a burrito.

DSC_0895

6. Fold the end with your filling over the filling.

DSC_0896

7. Fold in the sides.

DSC_0906

8. Slowly roll up the filling in the rice paper.

DSC_0897

9. Mix the Low Sodium Soy Sauce and the Sweet Chili paste together. If you like toasted sesame seed oil, a splash of that adds some great flavor but it isn’t necessary.

10. Dip in your Summer Rolls and chow down!

DSC_0882

I know the dipping sauce is pretty simple and not that innovative. I tried a bunch of different variations and concoctions- garlic, soy sauce, ginger, sweet chili sauce, sesame oil, hoisin sauce, rice vinegar, etc- but honestly, my favorite was just the simple sweet chili sauce and soy sauce combo. It was easy, came together fast and the simplicity matched the rolls. I like these rolls because they are fast and light which is what I’m looking for in this heat. I didn’t want to complicate the meal with a fancy sauce. Feel free to experiment though!

When I made these for the family, I paired them with these green beans and the meal was a huge success!

Ok, tomorrow, we are back to dessert. And if the past few months are any indication, that will be the norm for the next two months. YEAH!

Read Full Post »

DSC_2259

During the whole Team Lean Challenge I did with my friend, Rachel, I cut out a ton of bad food. I realized if it was in my house, I would eat it. I’m looking at you bread, pb and chocolate chips. I may not have cookies in the house but combined, you make an amazing 9pm snack.

At the top of my list was pasta. It’s just so easy! I mean, I could roast a ton of veggies which takes forever… or I could just heat up some noodles and dump some sauce on it/cook up roman noodles/pour boxed mac and cheese into a pot.

DSC_2249

See. Pasta had to go.

But the week of the bombings in Boston, a friend of mine was planning a potluck for Sunday as a way to end what had been a very stressful week on a positive note. It was a great idea! I brought this and all the non-vegans ate it up. I had no leftovers!

Of course, it was so delicious, I was dying to make it again, fitness challenge or not! When I made it for just me, I pumped up the veggies significantly and added some tofu for an extra kick of protein. The result was a super creamy, veggy-packed noodle fest. So delicious!

DSC_2251

Peanutty Noodles and Veggies
adapted from Chloe Coscarelli’s Peanutty Noodles recipe found in Chloe’s Kitchen and on line at KATU.com
s
erves 4 to 6

  • 1 pound brown rice noodles
  • 1 block of tofu, pressed and cubed
  • 1 cup coconut milk
  • ½ cup water
  • ¼ cup maple syrup
  • ¼ cup soy sauce
  • ½ cup peanut butter, chunky or creamy
  • 1 tablespoon chili-garlic sauce
  • 1 teaspoon grated fresh ginger
  • 3 cloves garlic, minced
  • 2 tablespoons lime juice
  • 1 tablespoon toasted sesame oil
  • 2 carrots, peeled and shredded
  • 1 cup of edamame (no shells, thawed if using frozen, which I did)
  • 1 red pepper, diced
  • 3 scallions, trimmed and thinly sliced
  • ½ cup peanuts, roughly chopped, for garnish

Instructions:
Bring a large pot of heavily salted water to a boil. Add brown rice noodles and cook according to package directions. Drain, rinse with cold water, and drain again. Return noodles to pot.

Heat some sesame oil in a skillet. Saute tofu in the pan until golden. (if you prefer your veggies cooked, you can also throw them in with the tofu at this time. I sauteed my edamame with the tofu but left my peppers and carrots raw). Set aside.

Meanwhile, make the sauce by combining coconut milk, water, maple syrup, soy sauce, peanut butter, chili-garlic sauce, ginger, and garlic in a medium saucepan. (this will look so gross when it’s all going into the pan and you will definitely be thinking “eeew! this is going to taste weird.” It won’t. Trust me.) Let cook over medium heat, whisking frequently, until sauce comes together and thickens.

Remove from heat and mix in lime juice and sesame oil.

Toss hot noodles with the sauce, tofu and veggies.

Garnish with peanuts and scallions and serve. Any leftovers can be served warm or cold the next day for a delicious lunch.

DSC_2256_2

I had fro-yo three times last week and may or may not be planning to share some Game of Thrones-themed cupcakes with you later in the week. Yeeeah…clearly, the fitness thing is over. Good thing I haven’t given up on the exercise!

PS. This would be great for a memorial day cook out. It tastes good hot or cold and it doesn’t scream, LOOK AT ME I’M VEGAN! well…maybe leave out the tofu if your hanging with all carnivores…

Read Full Post »

Sloppy Chicks

DSC_2255

I know I’m being annoyingly clique right now but I REALLY wish it wasn’t Monday. I could have used one more day this weekend.

My oh-so-awesome landlord decided that the construction he has been doing the last several week should continue at 7 am on Saturday, my one day to sleep in. I was thrilled to turn over in bed at such an early hour and see a middle aged latino man working outside my window as I slept and he worked on the apartment. Thankfully, my blinds were mostly shut. Mostly.

I was then even more overjoyed to see that our driveway was strewed with wooden boards, discards shingles, tools and machines making it impossible for me to get out until around 4 pm, when they were finish their work and had cleaned up. So much for a fun filled day of errands and shopping

DSC_2248

Yes, I was in an excellent mood on Saturday.

Thankfully, I made good use of my Saturday evening by having a few friends over and watching the first few episodes of Games of Throne. I may be kind of addicted! Can we just talk about how infuriating the Lannisters are?! ARGH! Every time Cersei Lannister and her ugly ass, scheming self are on the screen I just want to punch her!

But I digress, a TV viewing party would be incomplete without some good food. I whipped up these vegan-friendly Sloppy Joes and they got thumbs up all around from my non-vegan friends. My friend, Rachel’s boyfriend, had three of them and he definitely isn’t vegan. I consider that a win!

DSC_2251

Sloppy Chicks
from Keepin’ It Kind

the original recipe says it makes 4; we used average hot dog bugs and we got 7 servings

Ingredients:

  • 1 tsp olive oil
  • ½ onion, diced
  • 2-3 cloves garlic, minced
  • ½ red bell pepper, diced
  • 2 15oz cans of chickpeas, rinsed and drained
  • 1 15oz can of fire roasted tomatoes, diced
  • ¼ cup tomato paste
  • 2 T soy sauce
  • 2 T Sriracha Sauce
  • 1 T Maple Syrup
  • 2 tsp dried oregano
  • 1 ½ tsp cumin
  • 1 tsp dried thyme
  • 1 tsp smoked paprika
  • 1 tsp liquid smoke
  • 1 T nutritional yeast (optional)
  • salt/pepper to taste
  • optional toppings: avocado or vegan cheese
  • 4 vegan hamburger or hotdog buns; could also serve it on a baked potato or with lettuce in a wrap

Instructions:

  • Pour the chickpeas into a bowl.  Use a fork to mash them until they are in small chunks/shreds.  I like to mash about half the chickpeas and keep half whole for texture. Set aside.
  • Preheat the oven to it’s lowest temperature.  Open the buns (if you are using them) and place the halves, cut side up, on the center rack (or on a baking sheet).  Let them heat up for about 10-15 minutes.
  • Heat the olive oil in a large shallow saucepan over medium heat for about one minute.  Add the onion and garlic and sauté until onions are translucent and garlic is fragrant.  Add the bell pepper and the chickpeas and sauté for about two minutes.  Add the rest of the ingredients and let it simmer, stirring occasionally, for about 10-15 minutes, until heated through and slightly thickened.  If it sticks, add a little water to scrape the pan and lower the heat a bit.
  • Once the buns are warmed and the chickpea mixture is hot, scoop the mixture onto the buns.  Serve while hot.

DSC_2256

I did spend Sunday eating brunch, working out and soaking up the sunshine so my landlord was not able to destroy my whole weekend. Can I just say, Sunday was beautiful here in Boston! If I could have  one wish, it may be that everyday is as beautiful as that day was.

So, any Game of Throne fans? Thoughts? I’m only on season 1 so don’t spoil anything but please, tell me I’m not the only one who wants to punch some of these characters in the face.

Read Full Post »

I got the Taylor Swift CD last week and seriously, I can’t stop. It’s not even funny.  I’m plugged in at the grocery store, there was an embarassing moment in an aisle of Target where someone totally caught me dancing to the song “Holy Ground”, and my poor roommates probably know the songs by heart because I’ve been blasting it while cooking, which is pretty much all I do. My friend, Melinda, even tried to stage an intervention by giving me a TON of new CDs and while I’ve given them a quick listen, I make it about 30 minutes before switching back to Taylor Swift.

This is a problem. Halloween in TOMORROW. I should be listening to a halloween playlist. I even have one made up! But nooo…I keep listening to “We are never, ever, ever getting back together” ad nauseam and wondering if Taylor Swift is trying to give me relationship advice through her music.

Seriously…I need help…

BUT, even if my music life is in shambles, I am totally prepped for Halloween, food-wise. I made a huge pot of this pumpkin cranberry soup for lunch this week. Check in tomorrow, too. I may be posting a cupcake recipe that I should have given you today but totally forgot to photograph. Fail…

Pumpkin Cranberry Soup
veganized from The New England Soup Factory Cookbook by Marjorie Druker. (seriously…buy this book)
found on-line at Food.com

  • 1/2 cup fresh cranberries (or 1/2 c. cranberry sauce or 1/2 cup dried cranberries)*
  • 3 tablespoons Earth Balance or other vegan butter
  • 1/2 large Spanish onion, diced
  • 1 celery stalk, diced
  • 3 carrots, peeled and sliced
  • 1 pound of fresh, uncooked pumpkin or butternut squash, cubed (Do you even need to ask which I used?  Butternut Squash Addict!)
  • 1 (16 ounce) can pumpkin
  • 4 cups vegetable stock
  • 1.5 tablespoons dark brown sugar
  • 1/4 cup pure maple syrup
  • 1/4 teaspoon ground nutmeg
  • 1/2 cup cashew cream (or 1/2 c. silken tofu or 1/2 c. heavy vegan cream)**
  • salt and pepper, to taste
  • pepitas for toppings

* The recipe called for dried cranberries but I couldn’t find them so I used fresh. I didn’t think this gave the recipe a ton of cranberry flavor so next time I will definitely use sauce

** Cashew cream = 1/2 c. raw cashews blended with 1/2 c. water until smooth. I like this because I feel it has a more neutral taste then vegan cream and I always have cashews, as opposed to silken tofu. All these options will work though.

Directions:

  1. If you are using dried cranberries, place the cranberries in a glass or ceramic bowl and 1/2 c. water. Cover the bowl and let the cranberries soak at least 2 hours or overnight.
  2. In a stockpot, melt the butter over medium heat. Add the onion, celery and carrots and saute 5 minutes.
  3. Add the fresh pumpkin/butternut squash and saute for another 5 minutes
  4. Add the canned pumpkin, stock, brown sugar, maple syrup and nutmeg and bring to a boil.
  5. Reduce the heat to medium and simmer 30 minutes or until fresh pumpkin/butternut squash is fork tender
  6. Remove from heat, add cranberries (or cranberry sauce) and puree or blend until creamy. (I used a immersion blender)
  7. Add the cashew cream and stir until incorporated
  8. Season with salt and pepper and stir well. Top with Pepita seeds!

I know a lot of people don’t like blended soup. It sort of has the consistency of baby food so I get it. I love adding seeds and nuts on top of blended soup for some crunch, which helps with the texture thing.

This soup is so warm and comforting. I had a huge bowl of it while I was camped out during Hurricane Sandy and it was perfect. It’s thick and hearty and I love all the Fall flavors.

Also… Halloween mini-sized candies don’t count calories-wise, right? Cause I may have had about a bajillion Monday while camped out on my couch riding out the hurricane and watching Dexter season 6 and 7. Please tell me you have seen this show! I’m so obsessed right now!

Also… download this song so when you see me dancing like a weirdo in Target you can join me and we can be weird together. Awesome!

Read Full Post »

With the exception of the Red Sox game I got to go to, last week was so not fun. At All. Without getting into the gory details, I saw an end to the on-again, off-again two year relationship I was in, which sorta kinda feels really shitty. You don’t realize how much you care for a person until you try to remove them from your life.

On top of that, I got a nice chunk of change stolen from my checking account. Apparently someone got a hold of my debit info and withdrew most of my money. Joy.

Needless to say, by Friday, I was looking at some serious wallowing time. I’m talking sad Taylor Swift and Emo music on repeat, all-weekend pajama wearing, hours of trash TV and ice cream binges, because when your sad, ice cream is the best thing ever. I was heading for a weekend of full-blown, end-of-relationship gloominess… with a side of police reports and changing all my bank info.

Then, my friend Whitney called and asked me to come to Portland. Um, yeah! That sounds way better then ice cream coma! I’m in!

I ended up having a blast! The only downside was it rained non-stop. By the time I came home, I just wanted to curl up with something warm and comforting.  So I made these. And they were A-MA-ZING. They were hot, creamy and filling and they hit the spot just as much as quintessential comfort foods like mac and cheese or soup would.

Butternut Squash and Black Bean Burrito
from OhSheGlows

Ingredients:

  • 1 medium butternut squash, peeled and cubed
  • 1/2 cup uncooked short grain brown rice (yields: 1.5 cups cooked)
  • 1-2 tsp olive oil
  • 1 cup chopped sweet onion
  • 2 garlic cloves, minced
  • 1 bell pepper, chopped (I used green cause Dad gave me one from his garden)
  • 1 tsp kosher salt, or to taste
  • 2 tsp ground cumin, or to taste
  • 1/4 tsp cayenne pepper, or to taste
  • One 15-oz can black beans, drained and rinsed, or about 1.5-2 cups cooked if you’re using dried
  • 3/4 cup Daiya cheese (I used mozzarella daiya cheese)
  • tortillas of choice*
  • Toppings of choice: (avocado, salsa, vegan sour cream, spinach/lettuce, cilantro, etc)

* the recipe says this makes 4 servings if you use the large or extra large shells. I used medium sized, whole wheat flour shells and I got about 5 servings.

1. Preheat oven to 425F and line a large glass dish with tinfoil. Drizzle olive oil on squash and give a shake of salt and pepper. Coat with hands. Roast chopped butternut squash for 45 mins. or until tender.

2. Next, prepare the brown rice. Add 1/2 c. dried rice and 1 c. of water to a pot. Bring to a boil and then reduce to low and simmer for about 30 minutes. Fluff with a fork.

(At this point, with the rice and butternut squash done (and possibly black beans), you can continue the next day if you want and everything comes together fast. This is perfect if you are making this for guests.)

3. In a large skillet over medium-low heat, add oil, onion, and minced garlic. Sautee for about 5 minutes, stirring frequently. Now add in salt and seasonings and stir well.

4.  Add chopped bell pepper, black beans, and cooked rice and sauté for another 10 minutes on low.

5. Add 1.5 cups of the roasted butternut squash to the skillet and stir to combine. I like to add 1 cup of butternut squash mashed well with a fork and 1/2 c. cubed. I think it makes the burrito extra creamy. Add Daiya cheese and stir until well melted and combined

6. Add bean filling to tortilla along with desired toppings. Wrap and serve. Or, if you are a bowl person when it comes to comfort food (like me!), this is just as good sans a wrap.

I am so addicted to these burritos. They are arguably the best burritos I’ve had. Plus, they satisfy the urge for fall food AND the urge for comfort food. The recipe says that you can add additional toppings but with each serving of this I had, I put on less toppings. I started with spinach, avocado and roasted chipotle salsa and by the end of the week, I was just eating this filling in a tortilla. It’s just so good you don’t need bells and whistles!

It’s fall and I’m recovering from a pseudo-break-up. Expect some serious comfort food on this blog in the next week or so. And chocolate. What situation isn’t made better by chocolate??

Read Full Post »

As someone who had been a vegetarian for 15 years before switching to veganism, I seriously do not get this whole bacon trend.

Bacon on cupcakes.

Bacon covered in chocolate.

Bacon in everything!

I don’t get it. Cupcakes had a good solid bacon-less run. I don’t feel like they were lacking.

With that said, I was having a recipe funk this weekend and was going through all my old recipe print outs (I collect recipes and cook books like some people collect cats…it’s scary…) when I came across this recipe. It had fake bacon AND fake mayo yet, it called to me. Maybe it was the avocado. Or maybe it was the thought of buying a fresh tomato at the farmers market and actually using it! Or maybe those three magical letters- BBQ- won be over.

Whatever the reason, I found myself reluctantly joining the bacon bandwagon this weekend and making a BLTA.

oh ok…the pseudo-bacon bandwagon. Whatever!

Anyway, it was good. Real good!

I suspect that was the BBQ Aioli that my sandwich was practically swimming in, though, not so much the faux bacon.

Chipotle BBQ BLTA
from Healthy Bitch Daily
one serving

  • 2 pieces of bread (HBD recommends sour dough. I used When Pigs Can Fly Tuscan Wheat)
  • 2-3 slices of tempeh bacon
  • 1 romaine leaf or a tiny handful of baby spinach (ok, so technically I made a BSTA sandwich…whatever!)
  • 2-3 slices of fresh tomato
  • 1/4 avocado, sliced or mashed
  • spoonful of Chipotle BBQ Aioli (see below)

Combine everything into a delicious sandwich, smoosh down so it’s bitable and consume. Keep lots of napkins handy cause it can get messy!

Chipotle BBQ Aioli

  • 1 cup of Vegenaise
  • 2-4 oz extra virgin olive oil (I used 2)
  • 2-3 drops of lemon juice (to help separation)
  • 1-2 TBSP chipotle pepper adobo sauce (juice from the peppers, not the peppers themselves)
  • 1 TBSP garlic, minced or pureed
  • 1-2 TBSP vegan BBQ sauce (I used Bone Suckin’ sauce…I may have also used 3-4 TBSPs…)

Place Vegenaise in a bowl and whisk in olive oil until blended; add a few drops of lemon juice if it starts to separate. Add all other ingredients, blend, and allow the mixture to stand for approximately 3o minutes.

I served this with a side of Kale chips and a ton of napkins. Because it was really good in that messy sort of way where you are left licking Chipotle BBQ Aioli off your fingers. Yum!

Read Full Post »

ahh yes. Another week as arrived. I spent the weekend moonlighting as Minnie Mouse at my niece’s Disney Carnival Birthday party (It was a bazillion degrees out!), working, and brunching it up with some friends at Fiori’s bakery (bagel sandwich with tempeh, avocado and spicy veganaise…so good!). I was hoping to catch up on some much needed sleep but that was the one thing I didn’t manage to fit in! There never seems to be enough hours in the day during the summer.

Anyway, due to the fact that it is, as a mentioned, a bazillion degrees out (and usually humid), my oven has officially been retired for the next few months (with the exception of roasted chickpeas…cause I’m obsessed!). I’ve been eating lots of salads, fruits and lighter meals which is why Wicked Vegan has been light on posts lately. Strawberries and blueberries drizzled with agave and shredded coconut (aka, my breakfast last week) is delicious but not super exciting! How many more weeks ’til fall? I miss the cool weather and comfort food!

Until then, here is one of the many salads I’ve been eating with yummy summer veggies.  Perfect for when you buy a crap load of corn on the cobb because they are 50 cents a piece…

Corn, Avocado and Tomato Salad with Honey Lime Dressing
salad was adapted from For The Love of Cooking;
serves 1-2  

  • 1 cooked corn on the cob (can be cooked however you like- grilled, boiled, etc)
  • a handful of cherry tomatoes, approximately 6, quartered
  • 1/2 an avocado
  • 1/8 c chickpeas (preferably roasted with a little salt and pepper)*
  • 5 strawberries, sliced
  • quinao (optional, about 1/2 cup per person)
Cut the cooked corn kernels off the cob. Toss with the tomatoes, avocado, chickpeas and strawberries. Drizzle Honey Lime Dressing (recipe below) over the corn mixture and let it sit for 10-15 minutes so the flavors mingle  and the avocado breaks down a bit (makes the dish creamier. yum!). Eat as is or mix with quinoa for a heartier dish.
*To roast chickpeas for this recipe, toss one 14 oz can with 2 TBSP of olive oil and salt and pepper (to taste). Roast for 25-30 minutes at 350 degrees. You can also use this cinnamon chickpea recipe with the cinnamon dressing for this salad and it also tastes delicious!

Honey Lime Dressing:

  • Juice of 1 lime
  • 3 tbsp vegetable oil
  • 1 tbsp honey
  • Sea salt and fresh cracked pepper, to taste
  • 1 clove garlic, minced
  • Dash of cayenne pepper
Add all the dressing ingredients in a small bowl and whisk to combine. Set aside.

I know this recipe seems to have a lot of ‘approximates’ and vague ingredient amount. It’s because I make it a little different each time. I may have found a really good deal on tomatoes that day but am running short on chickpeas, or I’m having this as a small lunch or I’m throwing quinoa in for dinner. I love it because I almost always have these ingredients in the house during the summer so I can make this  quickly for almost any meal/snack. It’s light for summer, requires minimal stove work (I always make the chickpeas in the evenings when it’s cooler and make one big batch at a time) and it tastes fresh- all the things I require from a summer meal!

Read Full Post »

I told you I wasn’t over my avocado obsession!

Welcome to the week before payday! This is the 4 day stretch, Monday-Thurs, where I’ve squandered my paycheck over the last two weekends on sangria, celtics tickets and a general social life (oh yeah…and student loans) and am now attempting to feed myself on the odds and ends of my pantry.

For example, I found a pack of yeast from god-knows-when and was able to make myself a loaf of whole wheat bread. Of course, I added 2/3 cup of water instead of 1 2/3 cup and very nearly lost what has been my lunch all week. But my roommate, Bonnie, came to my rescue. She deserves a shrine or something.

Also, I’ve been eating A LOT of overnight oats due to the fact I bought rolled oats in bulk last time I went grocery shopping. I’m still convinced that’s the best breakfast ever.

For dessert, I’ve been eating these week old cookies and these no bake fudge balls. Except, this is my second attempt at making this ‘fudge’ and it came out all wrong again! Which is why I’m not sharing it with you. I’ll just link you to the original recipe so you can drool over what my lumpy bits of wannabe chocolate SHOULD look like.

Anyway, so here is my economic lunch I’ve been eating this week. I was craving sushi but that’s too rich for my budget this week. This is sort of the poor girls, practical take on a cucumber avocado roll (which is hands down one of my favorite foods) and something a little different from avocado toast:

Cucumber Avocado Sandwich
*all ingredients are approximate and will depend on the size of your bread*

1 slice of bread (free, since I had all the ingredients in my house)
1/4 c. hummus (free, since I had all the ingredients in my house)
1/2 an avocado (on sale at Whole Foods 3 for $2)
1/3 of a cucumber
a sprinkle of sesame seeds (free, had in my spice drawer)
sprinkle of soy sauce (free, had in my fridge)

Toast your bread. Slather on the hummus of your choice (I made garlic hummus). Top with sliced avocado, cucumber, sprinkle of sesame seeds and a drizzle of soy sauce.

I know it sounds weird but it’s so good! You can pair it with soup, such as miso soup which is suppose to be very good for you, or some raw carrot sticks. Or you can add another slice of bread and make it into a legit sandwich. Either way, it’s a pretty cheap lunch, even if you have to buy all the ingredients, such as bread and hummus. They will both carry you through the week.

What are some cheap meals you throw together when you’re on a budget?

Read Full Post »

Hot Veggie Salad

Here’s the thing: Blogging can be hard!

Sometimes, it’s late Sunday night and you should be posting recipes but you are sitting in the Cheesecake Factory shoveling the 800th guacamole-ladened tortilla chip in your mouth with a friend under the pretense of “planning your week”. Ok, whatever…do we get free refills on the guac?

Other times, it’s a freezing cold Thursday and you should be posting recipes but you are at a friends soaking in the warmth of their apartment under the pretense of lending an ear to their woes. “oh man, that’s awful! Why don’t I just stay here a few more hours to comfort you…”

Or sometimes, I just plain forget! I take pictures of all my meals, I plan out my week for when and what I’m going to post, and then I just forget. It’s kinda pathetic.

But this recipe is amazing for lunches, so if you can pull yourself away from restaurant eating/socializing/whoring-yourself-out-for warmth, I would seriously recommend preparing a batch of this to be consumed throughout the week. It comes together pretty fast.

Hot Veggy Salad
from Healthful Pursuit

makes 2 cups (I tripled the recipe so I could have it for lunch during the week. )

Ingredients

Rice

  • 1.5 cups water
  • 1/2 cup brown basmati rice, uncooked (the original recipe called for wild rice but I just used what I already had)

Cayenne roasted veggies

  • 1 yellow pepper, diced small
  • 2 carrots, diced small
  • 10 asparagus spears, diced small
  • 1 tbsp coconut oil, melted
  • 1/4 tsp ground cinnamon
  • pinch cayenne (the cayenne is SO subtle. If you want spice, you definitely will need more)

Maple dressing

  • 1 tbsp extra virgin olive oil
  • 1 tbsp maple syrup
  • 1 tbsp unpasteurized apple vinegar
  • 1 tbsp gluten-free mustard
  • 1/4 tsp Herbamare or salt
  • dash freshly ground pepper
  • 1/4 cup sunflower seeds (if you are making this ahead of time like I did, keep the sunflowers to the side and add them right before you eat so they don’t get soggy)

Directions

  1. Prepare the Basmati rice (or your rice of choice) according to the package
  2. Meanwhile, preheat oven to 400F.
  3. Place pepper, carrot, and asparagus in a large bowl. Stir in the coconut oil until all the veggies are coated. Your veggies will not taste like coconut. Sprinkle with cinnamon and cayenne. Place in the oven for 20 minutes, or until veggies are tender. (Alternatively, healthfulpursuits.com says you can do this on a stove top, cooking on medium heat for about 8-10 minutes, but I like the taste of baked-in-the-oven veggies more, I don’t know why…)
  4. Remove veggies from oven and place in the bowl with rice.
  5. In a small dish combine olive oil, maple syrup, vinegar and mustard, salt and pepper. If you are making this head of time, store separately from the salad. I used an old, glass olive oil jar. It worked perfectly!
  6. When ready to eat, microwave the rice and veggies for a few minutes. Pour the dressing over the salad, stir, and top with sunflower seeds.

Aren’t the colors super pretty in this salad?! I was super excited for this recipe because I wanted something loaded with vegetables that wasn’t your standard romaine lettuce/carrots/dressing salad. That gets so boring after a while. Plus, its warmth and color helps fight off the winter blues, which has definitely hit Boston- finally. But all the colors in the world won’t motivate me to eat this if it isn’t easy and yummy, which it was. I was able to package this up into servings for lunch and just grab it in the morning! Love how easy that is!

Reused Olive Oil bottle works excellent for home made dressings!

Now, if you’ll excuse me, I need to go make a few phone calls to see who with heat I can bribe with cookies in exchange for letting me crash on their futons/couches. It’s an icebox in my house!

Read Full Post »

Older Posts »