Feeds:
Posts
Comments

Archive for the ‘Recipes’ Category


DSC_0853

Welcome to Day 1 of our 12 Days of Christmas Cookies!! As pumped as I am for the first Christmas event on Wicked Vegan, it took me almost no time to come to the conclusion that this little special is going to involve me eating a LOT of cookies. My plan was to give some away but, well, that is proving better said then done. For instance, this week I baked up 4 types of cookies, all which I photographed today since I was home during the day (Hello, natural lighting!!). Which means, all week, I have had fresh-baked cookies chillin’ in my house, including some of the best chocolate chip cookies I have ever eaten.

Yeah…let’s just say you won’t be seeing the whole batch of those chocolate chip cookies.

DSC_0847

These cookies, though, are just too adorable to keep to myself! I didn’t intend for it to happen but don’t they look a little like christmas wreaths?? So cute! These are just plan ol’ sugar cookies with a little pizzaz thrown in.  Tired of seeing crazy concoction cookies like, bacon, whiskey cookies with artisan chocolate chips or blueberry basil thumb prints with  fresh lemon curd made with the tears of virgins? Yeah, it’s getting a tad out of control. These are great because they are simple and tasty without losing any of the presentation that you may want for gifts or holiday parties.

DSC_0849

Pinwheel Sugar Cookies
veganized from Wiltons Gifts from the Kitchen
makes approximately 21

  • 1/2 c. (1 stick) vegan butter, such as Earth Balance, softened
  • 1/2 cup granulated sugar
  • 1 Ener-G egg
  • 1 1/4 tsp vanilla extract
  • 1 1/2 c. all-purpose flour
  • 1/8 tsp salt
  • Food coloring of your choice (Obviously I chose green. I just used some that was in my cabinet from Stop and Shop. If you want an all natural variety, I have used India Tree before and liked them. )
  • about a cup of sprinkles of your choice. I would advice you use a smaller type such as nonpareil. The bigger jimmies I used had a hard time sticking.
  • 1/4 c. vegan chocolate

1. In a large bowl, cream butter and sugar using electric mixer. Add Ener-G egg and vanilla extract; mix well. Stir in flour and salt, mixing until well blended.

2. Divide the dough into two equal portions. Add food coloring to one portion; knead to blend. Shape each portion to form 4 x 5-inch rectangles; wrap in plastic wrap. Refigerate dough 45-60 minutes.

3. Remove dough from refrigerator. Roll out colored dough on Parchment Paper (in can be a little sticky if it warms up or is over worked) to form 6 x 11-inch rectangle; set aside. Repeat with remaining dough. Place white dough rectangle over colored dough rectangle. Gently press dough together. Starting on one 11-inch edge, roll up dough jelly-roll style. Wrap roll in plastic wrap; refrigerate 1-2 hours until firm.

4. Preheat the oven to 375 F. Remove roll from refrigerator. Slice roll crossways into 1/4-inch rounds. Place each round onto ungreased cookie sheet, spacing 1 inch apart.

5. Bake 8-10 minutes or until the bottom edges are lightly golden brown. Remove from oven. Cool cookies on baking sheet 2-3 minutes. Transfer cookies to cooling rack; cool completely.

6. Places sparkles in a small bowl and set aside. Place chocolate in a microwave safe bowl. Microwave for 30 seconds and give chocolate a stir. Repeat this process every 30 seconds until the chocolate is melted.

7. Spread a small amount of chocolate around the edge of the cooled cookie. Immediately roll edge in sprinkles. Place cookie on parchment paper to set.

DSC_0858

You can’t go wrong with a well made sugar cookie at a party, especially when they are this cute. I also love that you can totally make them your own by switching up the dough color and the sprinkles. Green and red dough with white sprinkles maybe? Blue and white with Cake Sparkles for a more winter or Frozen theme? Totally doable! If you are using a lighter colored sprinkle, I would maybe try switching out the chocolate for a light coating of icing. Something like this may work better. I haven’t tried that but I would imagine it would look a bit nicer.

DSC_0859

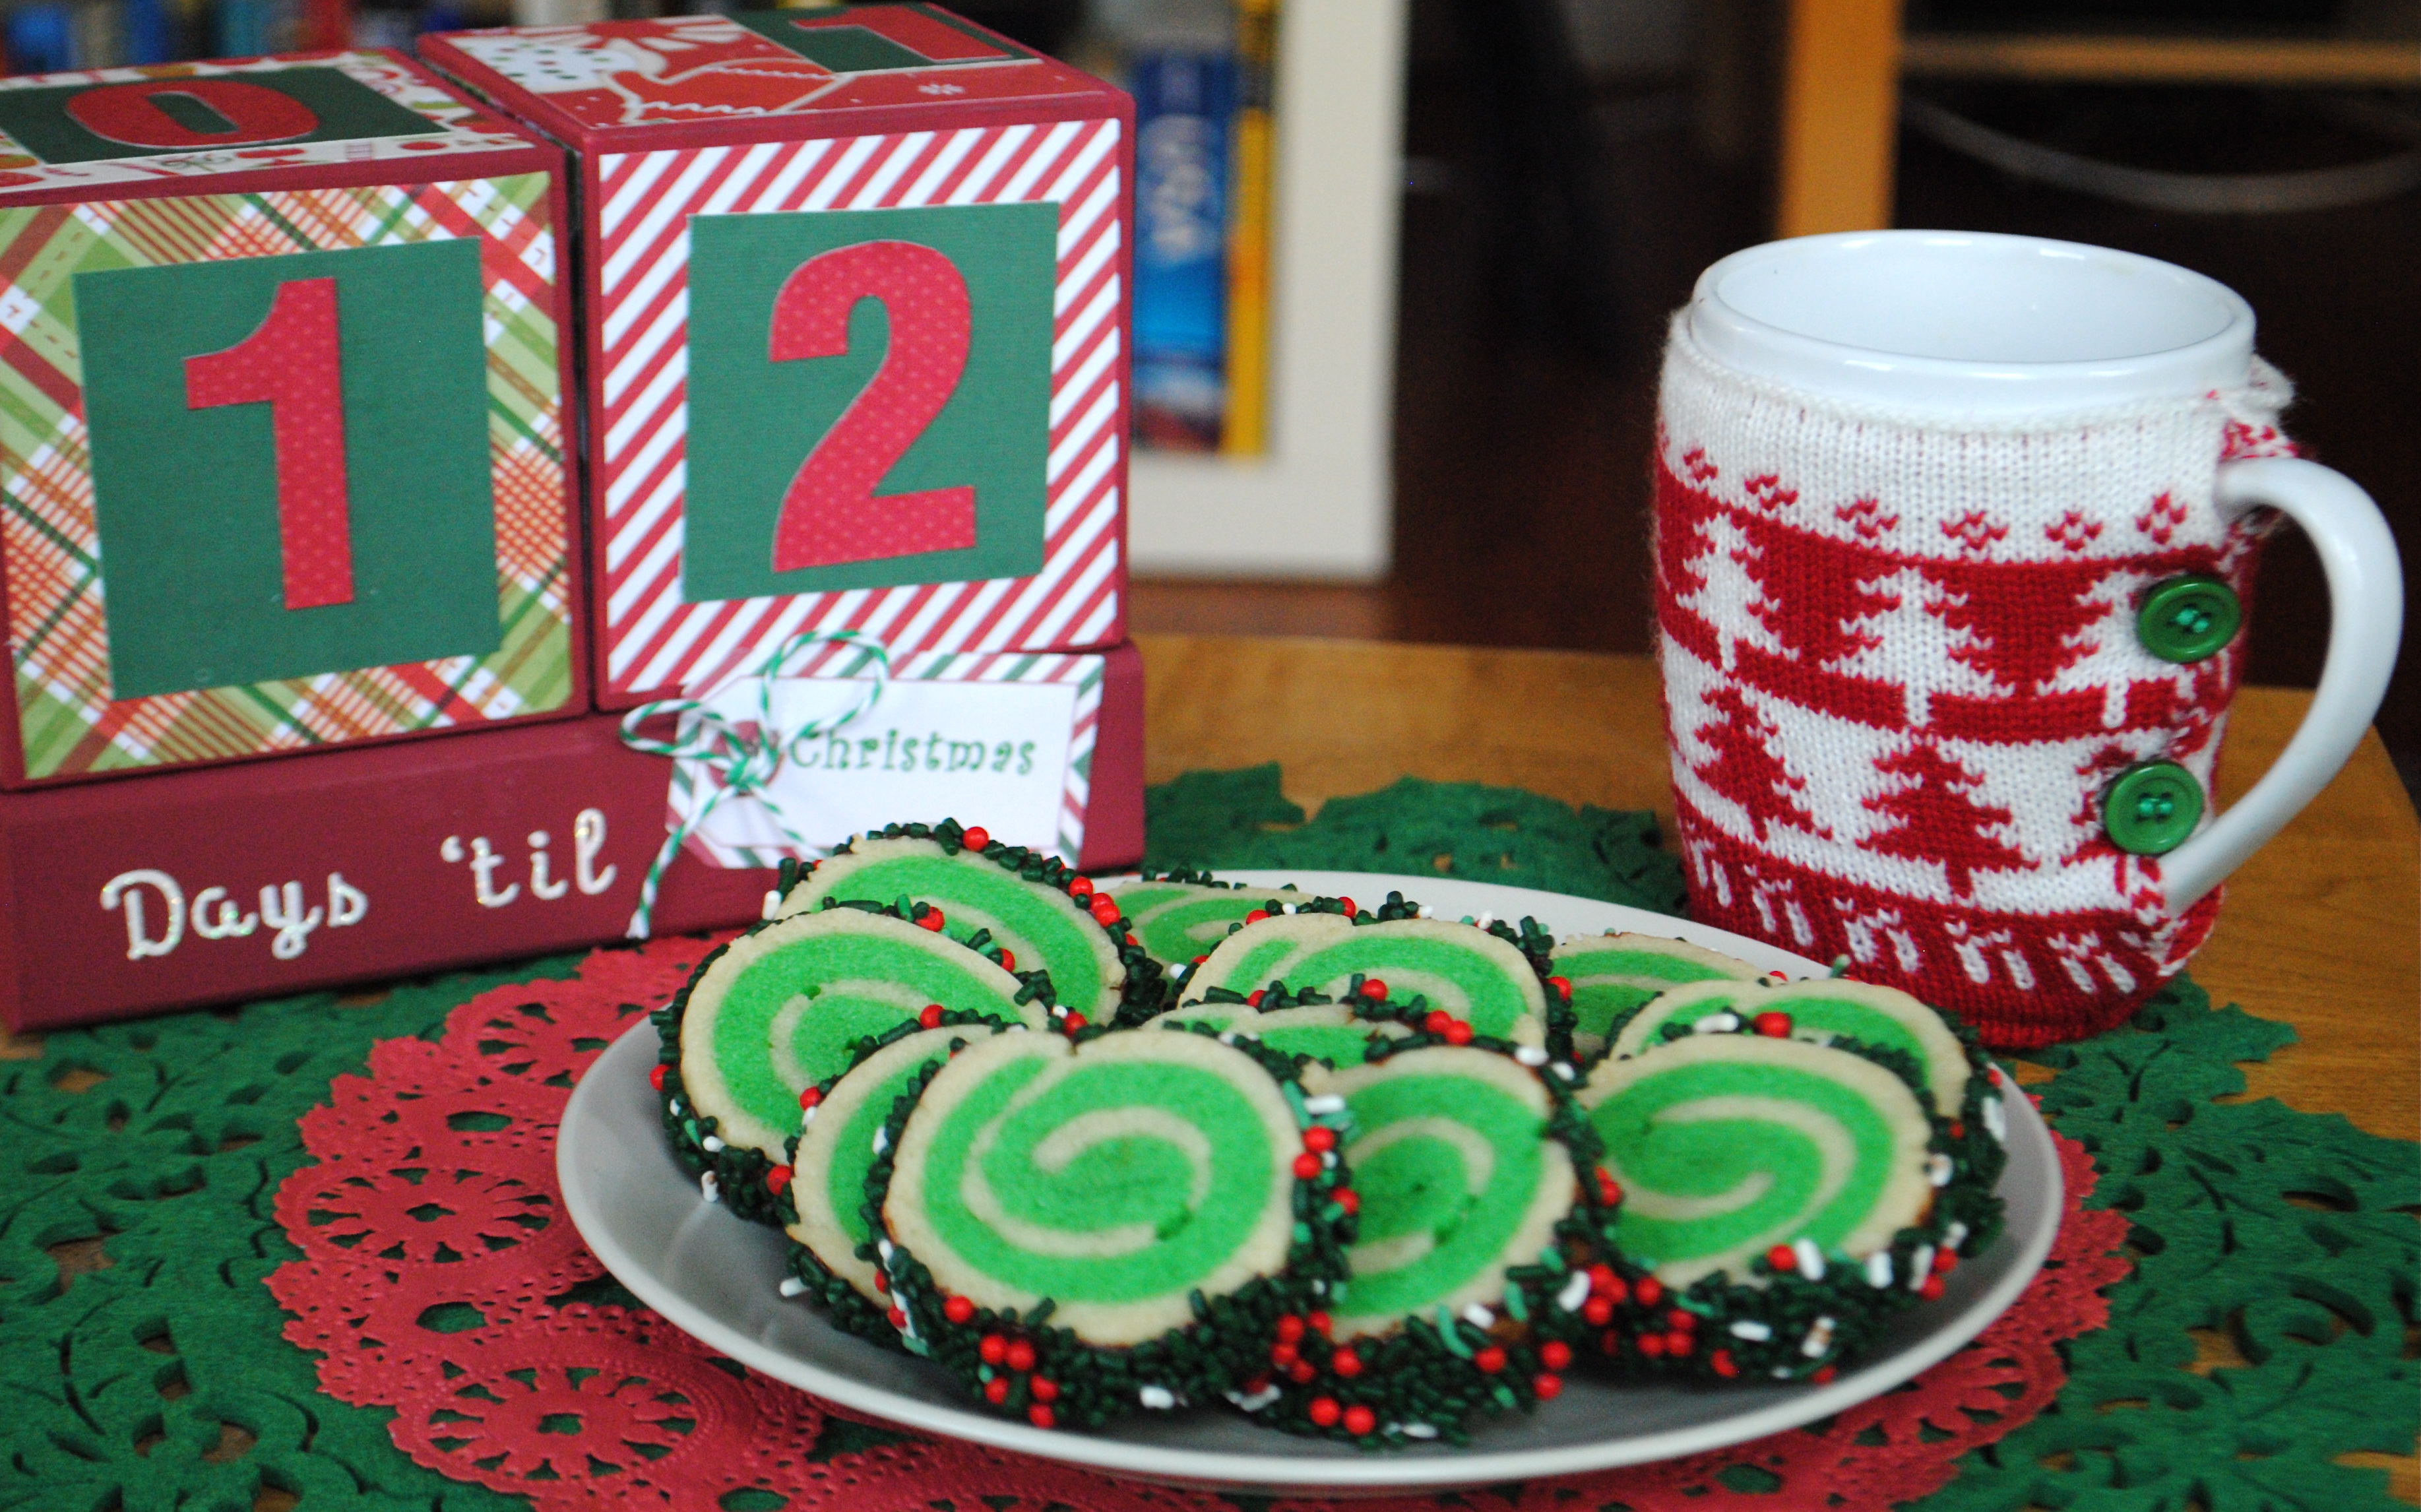
PS. How cute is my Christmas count down clock? My mom made it for me after she saw my Halloween one. Crafts and cookies- they are definitely two of the perks of Christmas time!! What cute crafts are you working on this year?

Read Full Post »

Wicked Vegan- Stuffed Accorn Squash1

ahh, Thanksgiving. Probably one of the hardest holidays for those with dietary restrictions. Raise your hand if you have been taunted with greasy turkey legs, been asked a million questions about your diet (“But where do you get your protein? Don’t you miss meat? What would happen if you had one bite? Wouldn’t it be funny if I hid meat in your vegetables?!”) and generally felt left out over this holiday. There was definitely one Thanksgiving when I was a vegetarian when my options were mashed potato, rolls and a garden salad. All good things but not super festive, you know? So I feel ya’. I’ve compiled some yummy tidbits from the blog that I think you could bring to your Thanksgiving dinner and not get crap over (“Is this some sort of healthy, vegan food??”). All the below recipes have been tested on meat eaters and received thumbs up.

Actually, that’s a lie…I never tested the Vegan Green Bean Casserole out on my family because I hoarded it all to myself. True story.

bbqpolentabites

BBQ Polenta Bites

Three Pepper Hummus

Buffalo Hummus

Blueberry Salsa

Black Bean Salsa

Hot Pretzel Challah Bread

pumpkinburger

Southwestern Pumpkin Burger

Butternut Squash Apple Soup

Black Bean Quinoa Soup

Green Bean Casserole

Garlicky Brussel Sprouts

Wicked Vegan PB Krispie Treats

Peanut Butter Krispie Treats (these would be so cute with little turkey cookie cutters and sprinkles)

Chai Spiced Cookies

Now, you can probably see there aren’t a lot of main dishes up there. The past few years I’ve eaten Tofurkey but I just wasn’t feeling it this year. Those Tofurkey loaves are a lot for one person! I end up having leftovers for ever. So this year I am trying a stuffed acorn squash. I was SO impressed and happy with the way it came out. I made this recipe while at my parents this weekend and my mom, a meat eater, got to sample everything and was equally impressed.

IMG_1300

Apple, Quinoa and Kale Stuffed Acorn Squash with Tahini Maple Dressing
from Edible Perspective, with mild adaptations
yields 4 main dish servings

for the dressing:

  • 1 garlic clove, peeled + smashed
  • 1/4 cup lemon juice
  • 1 tablespoon olive oil
  • 3 tablespoons tahini
  • 2-3 teaspoons pure maple syrup
  • salt + pepper to taste

for the squash and apples:

  • 3 tablespoons unrefined coconut oil
  • 1 1/2 tablespoons pure maple syrup
  • 1/8-1/4 teaspoon cayenne pepper
  • 2 medium acorn squash
  • 2 crispy apples (I used honeycrisps)
  • salt + pepper

for the kale and quinoa:

  • 3-4 teaspoons unrefined coconut oil
  • 1 cup uncooked quinoa, rinsed and drained
  • 2 cups water
  • 5-6 cups chopped kale (lacinato/dino was recommended but seriously, I can never find it. Curly green kales works just fine)
  • 1 1/2 teaspoons minced garlic
  • salt + pepper to taste
  • 1 tablespoon lemon juice
  • 4 – 5 TBSP dried cranberries
  • pecans for garnish

for the dressing: Combine the smashed garlic, lemon juice, and oil in a jar.  Seal and shake vigorously.  Let sit for 10 minutes.  Shake once more then remove the garlic.  Add tahini, maple syrup, lemon zest, and a big pinch of salt and pepper.  Seal and shake until smooth.  Taste and adjust salt/pepper/maple syrup if needed.  Set aside.  Store leftovers in the fridge for up to 1 week.

for the squash and apples: Preheat your oven to 400* F.  In a small pan combine the coconut oil, maple syrup, and cayenne over medium-low heat and stir until melted.  Take off the heat.  Slice 2 acorn squashes in half, remove and toss the seedy middle and coat the flesh with the oil/maple mixture.  Place squash halves cut side down on a baking sheet and roast for about 35-40 minutes until tender.  A few minutes later slice the apples into 1/4-inch thick slices, removing any seeds/core.  Place on a baking sheet and toss to coat with remaining oil/maple mixture.  Place in the oven during the last 7-10 minutes of squash roasting.  Roast for 7 minutes to maintain a nice crunch.

for the kale and quinoa: As soon as the squash is in the oven heat a pot over medium with 2 teaspoons of coconut oil.  Once hot add the quinoa and stir for 2-3 minutes.  Add the water then raise heat to medium-high.  Bring to a boil, stir, then reduce heat to simmer and cover for 15 minutes.  Remove from the heat and keep covered.  After placing your apples in the oven to roast place a large pan over medium heat and melt 1-2 teaspoons of coconut oil.  Once hot, add the garlic and stir for about 30 seconds, then add the kale and stir frequently for about 3-5 minutes until wilted.  Fluff the quinoa with a fork and combine in the pan with the kale.  Sprinkle with a good amount of salt and pepper and add the lemon juice and craisins.  Stir to combine. Once the the squash and apples are complete, dice the apples and combine with the quinoa and kale.

to assemble: Place the roasted squash half on a plate and fill with the quinoa mix. Drizzle with the tahini dressing and sprinkle with pecans.

*NOTE* If you are making this for Thanksgiving, you can make the dressing and quinoa/kale mixture ahead of time (including the apples) and save the acorn squash for the day of. You can microwave the filling after  you pull out the squash. It will save some time and dishes when there is a ton going on in the kitchen. You can also cook and stuff the acorn squash the night before (do not put dressing on) and reheat the next day on 350 for about 40 minutes uncovered (covering may speed the cooking time). Just a few things to keep in mind when prepping for Thanksgiving.

—– other serving option —–

for a salad- style dish: visit Edible Perspectives page and check out how she presents this as a salad dish. This option would be great if you want to make this dish for a large group of people or want to serve it as a side-dish.

Wicked Vegan- Stuffed Acorn Squash3

This recipe is so yummy! I love love love the dressing and will most likely be using this as my go to dressing going forward. Also, I am a huge fan of the roasted apples and craisins mixed in. It gives it such a nice sweetness. Plus, it just looks so pretty when plated up!

If you are wondering what I served with it in the picture above, that is the stuffing I will be sharing with you tomorrow. Trust me when I say you are going to want to tune it. It has this challah pretzel bread in it!

Read Full Post »

DSC_0752

It’s Monday morning and I am starting the week off with a confession. You ready? ok…

I am SO FRICKIN’ EXCITED for Taylor Swift’s new CD.

My roommates were both gone this weekend so in addition to being lazy and binge watching Law and Order: SVU, I listened to the songs she has released so far off her new CD over and over and over again while baking these cookies and dancing around my kitchen. I’m loving the new songs so much. It was kind of the perfect weekend.

Ok, now that I have professed my love for T-swift, I will get to the cookies. These beauties were inspired by Taylor when she posted on her instagram (really? are we even surprised I follow her?) that she had made “chai sugar cookies with eggnog frosting aka christmas in September”. I couldn’t get the idea of chai cookies out of my head after that. Especially when October hit, the weather cooled and my body just wanted to hibernate and drink tea all day. I did a bit of research (by which I mean I internet stalked her) and discovered that she made sugar cookies with chai tea in it. Like, she cut open a chai tea bag and poured it into the batter for sugar cookies. This presented me with 2 problems: 1. For some reason, me and sugar cookies don’t mix. I don’t have a sugar cookie recipe on this blog because I never like the results. So using sugar cookie as a base wasn’t going to happen and 2. I don’t have a bagged chai tea I love. Whatever, call me a snob but I like this version way better. So to put meh tea into a meh cookie base wasn’t going to fly for me. Plus, I was in fall mode and I wanted to add pumpkin some how.

DSC_0755

Thus, this cookie was born. It’s a chai cookie with just a tiny hint of pumpkin, which is exactly what I was going for. Everything is so super pumpkin-y right now that I wanted something a little more subtle. It still feels like fall though with all the warm spices. You just want to cozy up on the couch with a good book, a cup of tea and an obsene amount of these cookies.

Chai Spiced Cookies with Pumpkin
inspired by Taylor Swift
modified from My Baking Addiction

  • 2 3/4 cups all-purpose flour
  • 1 teaspoon baking soda
  • 1/2 teaspoon baking powder
  • 1/2 teaspoon salt
  • 1 3/4 cups white sugar
  • 2 1/2 teaspoon ground cinnamon
  • 1 teaspoon ground ginger
  • 1/2 teaspoon ground cardamom
  • 1/2 teaspoon ground allspice
  • 1 cup vegan butter (such as Earth Balance), softened
  • 1/4 cup pumpkin (or 1 “Ener-G” egg)*
  • 1/2 a vanilla bean, seeds removed (or 1/2 tsp vanilla extract)

*Using Pumpkin instead of an Ener-G egg with produce a softer, richer cookie. Ener-G will produce a more traditional cookie texture. I kept the pumpkin version of the cookie in for 1 minute longer then the Ener-G because of this.

1. Preheat oven to 350 degrees. Line a baking sheet with parchment paper; set aside.

2. In a large bowl, sift together flour, baking soda, baking powder and salt. Set aside.

3. In a medium bowl combine sugar, cinnamon, ginger, cardamom, and allspice. Remove 1/4 cup of the sugar-spice mixture, set aside to reserve for rolling the cookies.

4. In the bowl of a stand mixer fitted with the paddle attachment or in a large bowl with an electric mixer, beat the butter and sugar-spice mixture until light and fluffy, about 3 minutes.

5. Beat in pumpkin and vanilla bean seeds, combine until fully incorporated.

6. Slowly blend in dry ingredients mixing until just combined.

7. Roll dough into balls (about 2 tsps of dough each) and then into the reserved sugar-spice mixture. Place dough balls on prepared baking sheet about 1 1/2 inches apart.

7. Bake in preheated oven for 8 to 10 minutes

8. Let stand on baking sheet two minutes before removing to cool on wire racks.

As I  mentioned in the note above, these cookies will be soft and doughy so be careful not to overcook thinking that they aren’t done.

DSC_0709
These cookies are just so spot on. They are just the perfect fall cookie without being in-your-face pumpkin. One of my friends tried it a few weeks ago and said it may be her new favorite cookie, which is kind of awesome! If you want more of a fall kick, try adding some Pumpkin Spice chips which are out in the baking sections now. I was going to give that a whirl but never made it to Target this weekend.

If you want a pumpkin cookie with chai spice try making this cookie and replacing the 1 tsp of pumpkin pie spice with the spices in the below recipe and omit the chocolate chips. I haven’t tried it yet but I bet it would be delicious!

This actually isn’t my first time baking to celebrate the release of a CD. Back in 2010, Taking Back Sunday released a live album called Live from Orensanz and I baked some  cupcakes to give out at work. It won be a pair of Matt Rubano Macbeth sneakers…which Macbeth NEVER sent me. I emailed them for months to try and get them and they never came. Shady, shady company. Not cool at all.

TBS cupcakes

Have you ever done anything fun for the release of an album or movie or anything? I can’t be the only weird one out there. Share your stories below!!

Read Full Post »

DSC_0711 The last few weeks have been hard. Like, I’m-not-even-sure-how-I’m-awake-and-functioning-right-now hard. In an attempt to make ends meet when moving back to Boston, I took a job at a cafe, which was part-time, and worked as a temp through a temp agency. This worked out well for a while but then I landed a 9-5, M-F desk job through my temp agency. Yeah! But since it’s a temp job, I still needed to keep the cafe job. Which is how I ended up working every single day for the past 30 days- Desk job Monday through Friday, Cafe job Saturday and Sunday. Surprisingly, it’s the cafe job that has been the most exhausting. 8 hours on your feet running around, making sandwiches and coffee and being ‘on’ for the customers is a long day. This is why the recipes haven’t been pouring out. Mostly when I come home, I’m putting my energy toward seeing all my friends that I have missed over the past nine months…or I’m sleeping. Ok, it’s mostly sleeping.  Energy for dinner? Does an apple with peanut butter and chocolate chips count? How about left over chips and salsa and pumpkin beer? There’s veggies in salsa! Despite the hectic, hectic schedule I’ve been leading, I have had time to consistently make one thing: Cold brew coffee. Yes, please! It took me a little while to get used to and to work out the proportion of water to coffee I like but it’s so easy. I can prep it on Saturday night, strain it on Sunday night and have coffee all week. It’s perfect. Because clearly, I am running on nothing but caffeine at this point. DSC_0695 So here is the thing about cold brew coffee: there are a lot of different ways it can be made and everyone seems to have a different strategy. Some people suggest freshly grinding your beans but leaving them fairly course- others say to grind them super fine. Some say let your grinds sit in water at room temperature, others say in the fridge. You have to find what you like best. The below recipe is a combo of everything I read and found online and what works for me. What you have to remember though is that this is a concentrate. It doesn’t have the bitter, acidity that traditional coffee has so it may be easy to mistake the smoothness for it not being “strong”. So not the case. There was definitely a day when I didn’t cut the coffee  and boy was I  jittery at my desk! Another thing to note is cold brew coffee is naturally sweeter. American Test Kitchen suggests replacing your sugar with a pinch of sea salt to bring out that sweetness. I haven’t tried that but I can tell you that when I’m not using the below flavored sweeteners (which I use a very little of!) that I’m not adding any sweetener at all. It’s a great way to cut that morning sugar rush out. OK, Enough Talk! Here’s the coffee and flavored syrups I’m loving right now :

DSC_0689

Option 1 for filtering out your grinds: Fine Mess Sieve and coffee filter over a bowl

DSC_0735

Option 2 for filtering out your grinds: Single-serving coffee cone and filter over your storage container. My preferred option.

Cold Brew Coffee Concentrate with Pumpkin Spice Syrup or Chocolate Syrup

Coffee:

  • 1 cup of whole coffee beans, medium roast is ideal
  • 4-5 cups of water depending on your preference (American Test Kitchen recommends 1 cup of grinds:4 cups water. I like 5 just as much and it’s a little cheaper. Stretching that buck!)

Directions:

  1. Grind your coffee beans to a “fine” consistency* (To grind my coffee, I use something like this)
  2. Transfer grinds to a large bowl, french press or mason jar. I use a large 1/2 gallon mason jar
  3. Add your desired amount of water. Give it a quick stir to make sure all the grinds get mixed in. Cover.
  4. Let sit for 24 hours, preferably in the fridge.**
  5. Strain out coffee grinds. If you are using a french press, the french press does the bulk of the work for you. Depending on how fine your grinds are, though, you may still need to filter them. For everyone else, you can line a strainer with a coffee filter or you can use a single-serving drip coffee cone, which is what I use. So cheap and so effective. I’ve also done the mesh strainer/coffee filter combo over a bowl as well and both work fine. See the two photos above for these two options.
  6. Serve over ice or heat up. Either way, Enjoy!

*”espresso or turkish” consistency is how everyone describes it online but seriously? My coffee grinder is the cheapest out there and there aren’t settings. Just grind it really well. According to American Test Kitchen, the fine grinds release more flavor **You can let it sit for longer. I’ve left mine for 36-48 before in the fridge and it was totally fine. Just don’t go less then 24 hours or it will be too weak. Some will argue that letting it sit at room temperature produces better results but I like mine in the fridge because I almost always drink my coffee iced. Try both ways to see if you have a preference. DSC_0703 Chocolate Syrup from Vegan in the Freezer

  • 1 cup of water
  • 3/4 cup sugar
  • 3/4 cup Unsweetened cocoa powder
  • 1/4 tsp salt
  • 1 tsp of vanilla

Directions:

  1. Bring the water to a boil and add the sugar.
  2. Stir until the sugar dissolves, which should be about a minute.
  3. Stir in cocoa and salt. Reduce heat so the mixture is simmering. Continue to let it simmer for 3 minutes, stirring constantly.
  4. Remove from heat and stir in the vanilla.
  5. Let cool. It will thicken as it cools.

DSC_0742 Pumpkin Spice Simple Syrup from The Messy Baker

  • 1 1/2 cups water
  • 3/4 cup brown sugar, light or dark
  • 1 cup of granulated sugar
  • 2 tsp ground cinnamon
  • 1/2 tsp ground ginger
  • 1/2 tsp ground cloves (I used 1/4 cause I don’t love the taste of cloves)
  • 1/2 tsp ground nutmeg
  • 1/4 cup pumpkin puree
  • 1 1/2 TBS vanilla extract

Directions:

  1. In a medium saucepan, add water and both sugars. Simmer on medium-low until the sugar dissolves, about 4 minutes
  2. Turn the head down to low and whisk in cinnamon, ginger, cloves, nutmeg, and pumpkin puree. Simmer for 8 minutes, stirring occasionally. Do not allow the mixture to come to a boil.
  3. Remove from the heat and strain through a mesh strainer lined with cheese cloth or a very thin, clean tea towel. If you are too lazy/too busy for this (um, me!), then skip this step. The spices and the pumpkin will sink to the bottom of the storage container leaving the syrup at the top to scoop out. You could also give the syrup a stir before using and include the pumpkin and spices in your coffee. I actually don’t mind it like that. I think it’s more flavorful! Just make sure you don’t forget step 4 below.
  4. Allow the syrup to cool to room-temperature before stirring in the vanilla extract. Store in a mason jar or airtight container. The syrup with last for 1 month at room temperature or 3 months in the refrigerate.

DSC_0696 So there are 3 recipes for you! Does that make up for the fact that I have been negligent for the past month? Probably not but I just gave you Pumpkin Spice Simple Syrup so that should count for something! Seriously, these recipes are so versatile! I use the chocolate syrup in hot and cold coffee (though I prefer it in hot I think), drizzled over ice cream or really, drizzled over anything! As for the Pumpkin Spice Syrup, come on! This is about 10x better then that crap you buy at Starbucks. 1. It taste better. A confession for you: I really hate Starbucks PSL. And I love Starbucks and Pumpkin. It taste so chemically to me! This stuff does not, 2. There is actual pumpkin in it! 20 bucks says the PSL does not have real pumpkin and 3. You can also use it in black tea, which is delicious, or over ice cream. Really, you can’t go wrong with either and I think you should go ahead and make these now. Also, if you could send a jar my way that would be awesome. God knows, I can’t get enough coffee lately!

Read Full Post »

Harvard Yard

Harvard Yard

I can’t believe it’s been over a month since I posted. It breaks my heart! I love fall so much and I usually love cooking and baking during October. Things have been so full on though since I moved back to Boston. Until last week, I had been working every single day for over 30 days straight. It was exhausting!! I was lucky if I had the energy to pour myself a bowl of cereal for dinner and eat it before passing out at an embarrassingly early hour, never mind making actually recipes. I haven’t even decorated for Halloween yet!!

But things are marginally slowing down here. I have my weekends back (for now…) and I’m almost all caught up on things that I didn’t have time to do while working. So, I can finally devote some more time to the blog! YEAH! I made some insanely yummy pumpkin things: granola, muffins and simple syrup (SO much better then Starbucks), some chai cookies and a kale salad (cause, you know, veggies and stuff), which I hope to get to you in the coming weeks (though I probably just jinxed myself).

For now, here is a recipe round-up of all my favorite fall foods that I have posted on the blog before. I know round-ups seem like a cop-out but I love doing them. I enjoy going back through and revisiting recipes I forgot about (Hello, Pumpkin Beer Pretzels and Pumpkin Cookie Dough Truffles!!) and reminding everyone of some favorite dishes (Black Bean Butternut Squash Burritos, Southwestern Pumpkin Burgers and Beer Bread…all SO good!).

Mini Pumpkin Baked Donuts

Mini Pumpkin Baked Donuts

Breads and Breakfasts

Apple Butter
Apple Cider and Pumpkin Spice Mini Baked Donuts

Apple Cinnamon Oatmeal
Autumn Breakfast Hash
Beer Bread with Pumpkin Beer

Mini Pumpkin Loaves

Pumpkin Beer Pretzels
Pumpkin Pancakes

Pumpkin Cranberry Soup

Pumpkin Cranberry Soup

Entrees and Actual Food

Apple Sage Pizza
Black Bean Butternut Squash Burrito
Butternut Squash-Apple Soup
Butternut Squash “Cheez” Sauce (and Jack o’ Lantern Quesadillas)
Butternut Squash Chipotle Chili
Butternut Squash Kale Rice Bowls
Cream of Mushroom Soup with Cashew Cream
Pumpkin Cranberry Soup

Red Bean, Potato and Kale Soup
Southwestern Pumpkin Burgers
(aka my all-time fav vegan burger)
Spicy Black Bean Quinoa Soup (this is the most repeated recipe on the blog. In fact, my mom just made it for me for my birthday last week.)
Sweet Potato Lentil Stew

Peanut Butter Cup Pumpkins

Peanut Butter Cup Pumpkins

Desserts

Deep Dish Pumpkin Chocolate Chip Cookie Pie
Graham Crackers (for your pumpkin pie crusts)
Peanut Butter Cup Pumpkins
Pumpkin Chocolate Chip Cookie Dough Truffles
(I want these right now!!)
Pumpkin Chocolate Chip Cookies

What are some fall staples I’m missing? I’m thinking definitely bulk up that dessert section! It’s looking a little sad. What are some fall vegan treats that you guys would like to see? Let me know in the comments below and I’ll see what I can do for you.

Read Full Post »

As I waxed on about on Wednesday, How Sweet It Is has been a favorite blog of mine for a while and I was pumped when I heard it’s creator, Jessica Merchant, was gracing the bookshelves with a cook book, Seriously Delish.

seriously delish

Upon receiving the book, it was really everything a fan of the website could want, and hopefully, the every day consumer would enjoy as well. The book has tons and tons of personality and stories from Jessica, which is what I think makes her blog so successful. She’s just her. And her cookbook is her. And it works!

And the recipes are fun! Roasted cherry, coconut and quinoa breakfast bowl? How delicious does that sound?? Prosecco-Cider Spiced Punch? Can it be fall now? Pumpkin Banilla Bread? Yeap, Banilla. She made up her own word in here. You will not be bored with this book.

Every recipe starts off with a little blurb from Jessica and almost every recipe has a picture, which is excellent! This is how I like my cookbooks.  My nerd side may be on display by admitting this but I like to sit down and read cook books and look at all the pretty pictures before I start tackling the recipes. I may also really like putting colored tabs on all the recipes I want to try buuuut that may just be an excuse to hit up Target during the back to school sale.

For this book, I made notes of the recipes I wanted to try and what I needed to do to make it vegan, if it wasn’t already. Surprisingly, for a cook book whose focus is NOT on vegetarian/vegan cooking, I did not feel like I lacked options.  This book is filled with recipes that are easily adaptable to a vegetarian and vegan life style. Some recipes that are already vegan- Coconut Almond Milk, Grilled Fruit Salsa and 3-bean crispy quinoa skillet are literally  begging for me to make them this weekend. Other recipes like thai chicken lettuce wraps (sub out chicken for tofu or tempeh), jalapeno-pineapple pizza with bourbon BBQ drizzle (leave off cheese or sub in vegan cheese. Also, this sounds amazing!) and White Cheddar Apple Crisp (Earth Balance for butter and leave out cheese) are easily changeable. Of course, you have your meat recipes which there is just nothing that can be done to make it vegan (I’m looking at you Cinnamon Sugar Bacon and Slow Cooker Short Rib Breakfast Hash) but I know a lot of my readers do eat meat so you guys will enjoy it! And, even though those were in the book, I in no way felt limited.

DSC_0707

NOW. Let me share my favorite recipe that I have made so far.

Zucchini Tacos with Grilled Corn Salsa
from Seriously Delish by Jessica Merchant

serves 2 to 4

Time: 30 minutes

  • 2 tablespoons extra-virgin olive oil
  • 2 shallots, diced
  • 2 garlic cloves, minced
  • 2 cups cubed zucchini
  • 1/2 teaspoon salt
  • 1/2 teaspoon freshly ground black pepper

Corn Salsa

  • 2 ears of grilled corn, kernels cut from the cob
  • 1 jalapeno chili pepper, seeded and diced (I used 1/2 pepper because the one I bought was huged!)
  • 2 tablespoons chopped fresh cilantro
  • Juice of 1 lime
  • 1/4 teaspoon of salt
  • 1/4 teaspoon pepper

Chipotle Crema

  • 1 tablespoons plin full-fat or low-fat Greek Yogurt (I used 3 tablespoons silken tofu)
  • 2 teaspoons adobo sauce from a can of chipotle chile peppers in adobo sauce
  • Juice of 1 lime
  • Pinch of salt
  • Pinch of freshly ground black pepper

For Serving

  • 8 (4-inch) flour tortillas, warmed

1. Heat a large skillet over medium-low heat and add the olive oil. Add the shallots and garlic and, stirring, cook until softened, 2 to 3 minutes. Add the cubed zucchini, salt, and pepper and stir. Cook, stirring, until the zucchini becomes slightly tender, 5 to 6 minutes. Remove the skillet from the heat and set aside.

2. For the corn salsa, combine the corn, jalapeno peppers, cilantro, lime juice, salt and pepper in a bowl and toss it together.

3. For the crema, whisk together the yogurt (or silken tofu), adobo sauce, lime juice, salt, and pepper. (I put it in a blender. It was a little runny that evening put it thickened over night)

4. To assemble the tacos, add some of the zucchini mixture to each warm tortilla and cover it with corn salsa. Drizzle the crema on top.

I loved these. They were fresh and tasted oh-so-summery. You could easily add more veggies or beans if you wanted to bulk it up, swap corn tortillas for the flours if you want to make them gluten-free or make the corn salsa separately if you wanted to use it as an appetizer with chips. So good!

DSC_0705


Now, let’s talk contest deets. It has come to my attention that a few people wanted to wait to submit their contest entry because they wanted to hear more about the book. Fair enough. I think I was just SUPER excited to give you guys something. So, the contest will end this Sunday, Sept 7 (this Sunday) at 11:59 pm. I will announce the winner Monday morning. Cool? Cool. Now go Tell All Your Friends (Taking Back Sunday- style) about this book and leave your comments about wanting to win over at this post .


Read Full Post »

I am so pumped for this give away, guys. SO PUMPED!!

If you follow Wicked Vegan at all, you know one of my favorite places to get recipes/recipe inspiration is How Sweet It Is. This isn’t a vegan blog but Jessica Merchant creates such interesting food, takes such fun photos and is so entertaining that I don’t even care. Her recipes for strawberry margaritas is my most favorite recipe ever and has turned me into a giant margarita snob.  I’m not sure what that says about me that out of all her recipes, my favorite is a margarita…

Anyway, when I found out she was releasing a book, I knew I had to pick up a copy! Thankfully, I’m back from Australia or things would have gotten ugly. AND, not only do I have a copy but one lucky reader can win a copy too!!! Just leave a comment below and I will randomly pick a winner on Friday when I officially post a review of the cook book (spoiler: I love it).

seriously delish

I know I’m sort of doing things backwards here but following convention is boring. So instead, I will give you a teaser recipe from the book, Oatmeal Cookie Granola. This granola is addicting and because I refuse to buy boxed cereal even though I love it, I’ve sort of just been eating this with fruit and milk in a bowl. You could get fancy and make it into a vegan parfait, maybe top off some oatmeal with it but seriously bowl + milk + this granola = total awesomeness.

DSC_0708

Oatmeal Cookie Granola
from Seriously Delish by Jessica Merchant, released here with permission.

makes about 4 cups
time: 1 hour (includes cooling time)

  • 2 1/4 cups old-fashioned rolled oats
  • 1 cup sliced almonds
  • 1/2 cup ground flaxseed
  • 1 tablespoon light brown sugar
  • 1 teaspoon ground cinnamon
  • 1/4 teaspoon salt
  • 1/2 cup honey (I used maple syrup to make it vegan)
  • 2 tablespoons unsalted butter, browned (I used 2 tablespoons of melted Earth Balance. Leave a comment below if you have had success browning vegan butter)
  • 2 tablespoons coconut oil
  • 2 teaspoons vanilla extract
  • 1/2 cup miniature chocolate chips (I used the Enjoy Life Mini Chocolate chips)

1. Preheat the oven to 325 degrees F and line a baking sheet with parchment paper.

2. In a large bowl, whisk together the oats, almonds, flaxseeds, brown sugar, cinnamon and salt.

3. Heat a small saucepan over low heat and add the honey (or maple syrup), brown butter (or melted Earth Balance), coconut oil, and vanilla extract. Stir until the liquid is warm and the ingredients have melted together. Remove the pan from the heat and pour the mixture over the oats. Stir it with a large spoon to coat and bring the mixture together. Spread it evenly over the parchment-covered baking sheet.

4. Bake for 10 minutes, then use a spatula to toss the granola. Bake for 10 minutes more and then toss again. Bake for an additional 10 minutes, tossing twice during the cooking time. Remove the pan from the oven and let cool for 5 minutes. Sprinkle the chocolate chips over the granola and lightly toss. Let the granola cool completely on the baking sheet.

Notes from the book: Allowing the granola to cool before storing it is the key to getting granola “clumps”. to help the clumping process, you can squeeze together handfuls of the granola once or twice during the cooling process. Store in a sealed bag or container for up to 1 week.

DSC_0728

Now, leave a comment below letting me know you are interested in winning the cookbook. I will announce the winner on Friday. And tune in tomorrow and Friday for another recipe and an official review. Also, if you are a fan of How Sweet It Is, Jessica is doing a book tour to promote Seriously Delish. You can get the deets here. Maybe I’ll see you at the Boston signing!

Read Full Post »

DSC_0400

This post is being written approximately three, two 1.5 hours before I want it to go live. Why you may ask? Well, because I had very important things going on this week. Things like:

1. Watch every vlogbrothers video ever created. Considering they have been creating videos for the past seven years, this is a giant project. It’s got me thinking that I could totally do that! I should create a series of vlog videos with my friends, after all, we all live in different areas- Boston, California, Australia, etc. We could all rotate in our contributions or just post randomly in reply to others. Then I realized, uh, nope. I know nothing about making vidoes, youtube and I’m crap at updating a blog so regular video updates would be awful. I’ll leave the blog updates to the Green’s and waste my time watching those. Win/win for me!

2. Reading 8 books at one time. No seriously, it’s like 8 books. I think I’ve acquired ADD and it’s running rampant. I’m reading teen, non-fiction, graphic novels, travel books, a book my friend, Melissa, wrote (YEAH!), and two I’ve already read! What is wrong with me? I don’t know.

3. Plan every trip I am ever going to take in the year 2014 and NOT book my ticket home. Because I am in denial. Hardcore.

and most importantly, 4. Lounging around in yoga pants all day because I hate all my clothes and have nothing to wear in the cooler weather that is descending.

so, yeah for procrastination and stuff. (My english teacher once told me to never use the word ‘stuff’ in a formal writing situation because ‘stuff should only appear in a turkey’. Does a blog count?)

I’m actually really glad I told myself I was posting this today because I was *this* close to having a bowl of granola for lunch but I knew I had to actually get up and photograph this sandwich. Plus, I can have cereal for dinner!

Nutty Basil Pesto
only slightly modified from FF Detox.com

  • 3 cloves garlic
  • 1/3 cup Brazil nuts or macadamia nuts (I used Brazil)
  • 1/3 cup sunflower seeds
  • 1/3 cup pumpkin seeds
  • 1 cups fresh basil
  • 1 cups fresh parsley
  • 2/3 cup cold pressed olive oil
  • 4 tablespoons lemon juice
  • Big pinch of sea salt

Soak the seeds and nuts overnight to release the enzyme exhibitors. Process the parsley, basil and olive oil in a blender until chopped. Add the garlic, nuts, and seeds, salt and lemon juice and mix until the mixture is finely blended into a paste. Store in dark glass jars if possible. It freezes well also if needs be. Serve as a dip, a sauce or a spread. My favorite way to eat is:

DSC_0406

Grilled Mushroom and Avocado Sandwich
serves 1

  • Earth Balance or dairy friendly butter, divided
  • 5 button mushrooms, sliced
  • 1 clove garlic, mined
  • 2 slices of bread (I like homemade sour dough)
  • 1/4 avocado (mine were fresh off the tree from the Gold Coast. Thank you, Sharon!)
  • hummus of choice
  • Detox Pesto

Heat some Earth balance over medium-low heat. Add the garlic, give it a quick stir and add the sliced mushrooms. Sautee until golden.

To assemble to sandwich: Spread one slice of bread with hummus and the other with the detox pesto. Add the garlicky, sauteed mushrooms and the 1/4 of the avocado sliced. Smoosh sandwich together. Butter the outside of the sandwich and grill in a pan over medium-low heat (or use a panini maker if you’re fancy like that)

Serve immediately.

DSC_0410

There are 6.5 more years of vlog brother videos to watch; rereading Hazel and Gus’s story (with a side of thoughts of crying); LA trip planning to do; demon love stories to sort out and you know, maybe some showering happening. This is all very pressing and I must go sort it all out! I promise you, I do actually have real plans this weekend. I’m hoping they will even make it into Tuesday Travels. YEAH!


Read Full Post »

DSC_0391

If there is one thing I have learned in this whole nannying gig, it’s that children between the ages of 6 and 13 (and most likely older) are vultures when it comes to sweets. I tried to stealthily open a package of cookies the other day and I had three little heads pop up over the couch like meerkats. The bag of marshmallows I had sent from home? Hoovered down before I had four s’mores. Bag of chocolate chips left open? Went to make cookies and there’s one chip left. Literally, 1.

So it didn’t really surprise me that the mom of the house decided to limit the sugar the kids were getting after Easter. We’d noticed one of the kids was sensitive to sugar and the other two, well, cutting their intact certainly wouldn’t kill them!

Along with cookies and candy, cereal was actually on the list of things that was limited. As I mentioned above, I clearly can’t keep things around the house without the kids finding them so having a box of cereal hidden wasn’t going to happen! I’d have to wait until I dropped the kids off at school before coming back for breakfast and that would not fly. I have to have some coffee and food in me before I face they world or things get ugly!

So here is my fast, easy breakfast that gives me fuel without attracting a swarm of sugar-and-cereal-detoxing children. They take one look at it and run the other way. Yes please! More for me!!

DSC_0390

Coconut Chia Pudding
adapted from How Sweet Eats’ Coconut Cream Pie Chia Seed Pudding

serves 2-4. 

1/2 cup vanilla almond milk
3/4 cup full-fat coconut milk (I used the Aussie brand “Ayam Organic Light Coconut Crwm. It was “light” but it’s cream, not milk. Aussie coconut milk tends to be a lot thinner then the US kind).
1/4 cup chia seeds
1-2 tablespoons maple syrup (I’d start with 1 TBSP and drizzle more on at the end if needed)
1 tablespoon unsweetened shredded coconut
2 teaspoons vanilla extract
1.5 teaspoon coconut extract
1 pinch of salt

optional toppings: granola (I use 1/4 cup), fruit, toasted coconut, coconut whipped cream, jam swirled in, graham crackers, etc.

In a large bowl, whisk together the almond milk, coconut milk, maple syrup, coconut, vanilla bean paste, coconut extract and salt until combined. Add the chia seeds last and whisk until combined.  Divide into servings, cover and chill for about 2 hours or even overnight. When you are ready to eat, top with your toppings of choice and Enjoy!

You can also keep it in one bowl, cover and divide into servings when ready to eat. I find the individual servings easier though because I can grab it, top it, put the lid back on and go out the door. No need to pour or divide anything in the AM. But I’m literally the laziest person in the world in the mornings and want to do as little as possible.

Will keep in the fridge for a few days (I’ve never tried more then three days).

DSC_0385

So it took me a while to get on board with this whole chia pudding trend. The texture is so strange! I actually prefer the homemade variety to the Chia Pods in the stores. The kind in the store is too solid and jiggly!

This kind though is delicious, especially with fresh berries and granola to give it some crunch. It’s also fast in the mornings. I like fast! If you want it to be faster, throw the fruit on at night and get your granola ready in a separate container so all you have to do is dump the granola in. SO easy.

Do you have any other fast breakfast ideas for the morning? I could use some kid-friendly, low sugar ideas!


Read Full Post »

DSC_0337

My April vacation has come to an end and I’m back to the daily grind. I will get more into what I did in my Travel Tuesday spots but I spent about a week at the Sunshine Coast, two days on a tour of Fraser Island and 4 days on the Gold Coast. The Gold Coast was a surprise addition to my travels and I am so glad I seized the opportunity to go when it was presented. Sometimes the best things in life are the ones that aren’t planned!

Anyway, with all of my traveling I haven’t had a ton of opportunities to cook. I did have a chance to help out at Easter dinner on the Gold Coast, though. I spent dinner with one of my boss’s business partners, Sharon, who opened her home to me and made me feel like family. Her family was so welcoming!

On Easter, I was put on veggie duty and helped make some homemade salsa and this super yummy salad. I was surprised how much I loved it! The ingredients are so simple but it is just so delicious. The first thing I did when I got back to Toowoomba was make a big batch for myself.

Of course, my second attempt at this salad didn’t come out as good as the one I made at East. Apparently, searching Youtube for Taking Back Sunday music videos instead of stirring the pine nuts is a big no-no. So you know, I wouldn’t recommend doing that.

DSC_0341

White Bean and Tomato Salad

  • 1/2 c. pine nuts
  • 550g or about 3 cups of mixed tomatoes, sliced (I used 350g of mixed grape tomatoes and 200g of yellow perino tomatoes. I like the smaller tomatoes but any kind will work)
  • 1/2 red onion, thinly sliced
  • 1/2 c. basil, thinly sliced
  • 1 can cannelloni beans, drained and rinsed
  • slightly less then 1/4 cup olive oil
  • salt and pepper, to taste

Place pine nuts in a small skillet and heat over medium-low heat. Stir continuously until the pines nuts begin to turn golden. Remove from heat and set aside.

Combine tomatoes, red onion, basil beans and toasted pine nuts.

Right before serving, add olive oil, salt and pepper to the tomato mix and tossed until well combined.

DSC_0386

I opted for the mixed grape tomatoes and the yellow perino because they tend to be sweeter and because they were just so gosh darn pretty! I mean, the deep red ones are practically purple so clearly I had to purchase them.

Plus, You tube distractions aside, this was such an easy dish to make. I love it because it comes together in minutes and it will last me a few days. It’s pretty and it comes together easily. What more could you ask for??


Read Full Post »

« Newer Posts - Older Posts »